Learn Getting a better Picture - Tips on filming and taking photo

Full Size Image Download (200px x 224px)
Photo and Film - Tips on filming and taking photos of POI and FIRE performances
23,840 viewsHOP • Published on 30 Apr, 2013
I have written this article to help out those who are having trouble getting a good photo.
These guides are also very good if you are submitting videos to show on the internet.
Video Camera- The three most important things for filming fire for the web are
- Use a tripod or image stabilization function.
- Keep Detail to a minimum.
- Use manual focus function.
Still Camera - Ideas for getting a better quality photo are
- Type of film
- Hold your camera steady
- Manual focus
- Longer exposure shutter speed
- Flash at end of long exposure
Using a Tripod and reduce movement
The use of a tripod often makes a dramatic impact in the quality of the final movie. This is because keeping the camera steady reduces subtle differences between frames and therefore improves the temporal compression of the video. You should use a tripod for your camera. If you plan to move the camera during filming, you should move it very slowly and as smooth as you can. A jerking camera motion is hard to compress.
Avoid hand-held shooting if possible. If your camera has an image-stabilization option you should turn this function on. Generally using this feature will reduce subtle changes between frames from camera motion.
Filming for display on the internet
Keeping the detail within the scene to a minimum will help the video compress better spatially. It will also make the video easier to see when the movie is reduced in size for web delivery. Painted or plain backdrops are a good idea.
If there is much detail or movement behind the subject, you can throw the background significantly out of focus to simplify the image. Trees are often used as backdrops for filming. The excessive detail of the leaves poses a challenge for compression and should be avoided if possible. If you must film against a tree, using a shallow depth of field to defocus the leaves will often improve the final movie. Beware of trees moving in a breeze - the high detail and subtle changes between frames make compression difficult.
Ask your subjects to wear clothes that don't have high contrast patterns or lots of details. Plain colours are best - bold stripes or checked patterns can do very odd things when resized and compressed.
Be sure to have some light available so we can also see the performer and not just the fire moving in circles.
Filming. Turn "Auto focus" off
If filming fire at night you will find it better using "manual focus". This is because "auto focus" will have difficulty working out what to focus on and will make fuzzy what you want to be clear.
Photo. Types of film
When selecting the ISO (ASA) speed of the film consider the following. For still action photo's at faster shutter speeds use a high ISO 400+. This will create a picture which captures a moment in time with a short flame trail. Use ISO 1000 for very faster exposure times in low light. This will give a clear steady picture of any flames. For longer exposure times use a nomal ISO value 100 - 200 film even lower if you wish.
Photo. Hold your camera steady
Hold the camera steady. This will help to give sharper images. Use a tripod if you have one. Otherwise hold the camera against something that is steady, a garden table, a fence etc.
Photo. Manual focus
Sometimes autofocus does not work with fire at night. It fails to focus on what you are trying to take a picture of. If you have the ability to set the focus length manually then I would suggest doing this.
Photo. Shutter speed
The longer the exposure time the longer the flame trail. Time how long it takes the poi/staff swinger to do 10 rotations (eg 10 seconds). Divide this amount by ten.This will give the exposure time for one full revolution of the POI (eg 1 second). If you want a short flame trail, about half a rotation, then set the exposure time to half that value (0.5 second).
Photo. Flash at end of long exposure
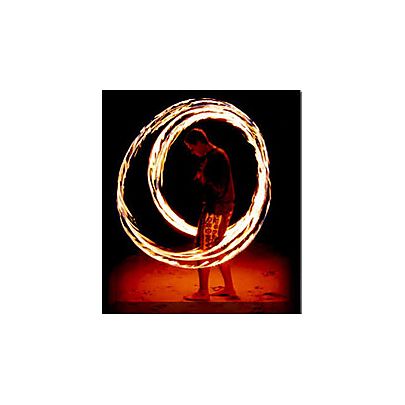
FIRE POI on Beach Some more expensive cameras have the ability to do a long exposure and then flash at the end before closing the shutter. Check your camera manual to learn about this function. What does this achieve? Looking to the right at Jeremy's photo you will see that the long exposure time shows one full rotation of the flame and the flash catches Jeremy's body at the end producing a clear image of him standing on some sand.
Make sure you have the flash the optimal distance away from your performer. Some flashes do not work well over longer distances. Again see your manual.
There are also multi flash functions within a single exposure. Lots of fun effects can be achieved with these functions.
| tracetheface Member #160145 Reged: Oct 2012 |
Handy tips. Thanks. |
Comments/replies: 1


